
Transforming your space can feel thrilling, but even small missteps can turn creative projects into stressful disasters. Whether you’re refreshing a room or tackling a full makeover, knowing common pitfalls saves time, money, and frustration.
Many enthusiasts jump into projects without a clear plan. They buy supplies impulsively or underestimate the time required. This often leads to half-finished rooms or overspending on materials that don’t work together.
Another mistake? Overcomplicating designs. Simple upgrades like paint or shelving can make a big impact. But adding too many elements creates clutter instead of charm. Focus on functionality first—your space should look good and serve your needs.
Safety is another overlooked area. Skipping prep work—like sanding surfaces or checking electrical wiring—can lead to accidents. Always research tutorials before using tools or materials you’re unfamiliar with.
Key Takeaways
- Plan every project step-by-step to avoid wasted time and resources
- Prioritize simple, functional designs over overly complex ideas
- Never compromise on safety measures during renovations
- Balance quality materials with budget-friendly alternatives
- Use tutorials to master new techniques before starting
Overcomplicating Your DIY Projects
What starts as an exciting makeover often becomes overwhelming when projects grow too elaborate. Designer Julie Rose puts it simply: “A thin painted line between two wall colors can stretch a small room visually—no heavy furniture or complex installations needed.” Her approach proves simplicity often delivers better results than crowded designs.
Mixing Too Many Design Trends
Scrolling through social media might tempt you to blend farmhouse shelves with boho textiles and modern lighting. But this creates visual noise instead of harmony. Choose one dominant style and sprinkle in accents—like pairing industrial stools with a rustic table—to keep spaces cohesive.
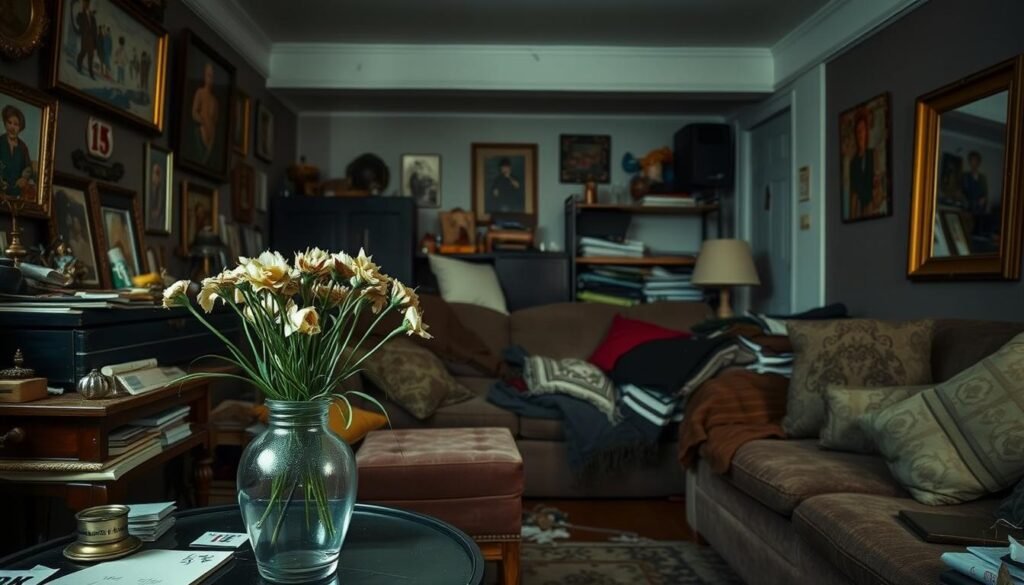
Creating an Overcrowded Space
More isn’t always better. A living area crammed with plants, wall art, and patterned rugs feels chaotic. Instead, leave breathing room between furniture and decorations. Need help editing? Get a tutorial on balancing negative space with statement pieces.
“Three quality items with purpose beat twenty random trinkets every time.”
| Recommended | Avoid | Why It Works |
|---|---|---|
| 2 complementary styles | 4+ competing trends | Creates focus |
| Functional multipurpose furniture | Oversized decor pieces | Saves space |
| Neutral base + bold accents | Clashing patterns | Easier to update |
Struggling to start? Watch tutorials on selecting color palettes or arranging furniture. These guides help avoid costly mistakes while keeping your project timeline realistic. Remember: Great rooms evolve through thoughtful edits, not overnight transformations.
DIY Home Decor Disasters to Dodge
Even seasoned crafters face setbacks when materials and techniques don’t align. Choosing the right supplies makes the difference between a showstopping upgrade and a sticky mess.
Using the Wrong Materials
Gold leaf sheets demand specialty adhesive, while outdoor furniture requires weather-resistant paint. Using regular acrylic paint on patio chairs? That’ll peel after one rainstorm. Always match products to their purpose—indoor fabrics stain easily, and particleboard crumbles under heavy use.
Watch tutorials before buying supplies. A teak tile bathroom project succeeds with proper adhesive, while gilded candle holders fail without sealant. Invest in solid wood for load-bearing shelves, not decorative brackets meant for photos.
Improper Application of Paint and Finishes
Skip sanding, and your paint job becomes a flaky disaster. Glossy surfaces need deglosser. Matte walls require primer. One creator shared: “I redid my floors three times before learning epoxy needs 72 hours to cure properly.”
| Smart Choice | Common Error | Result |
|---|---|---|
| Oil-based enamel | Latex on cabinets | Chips in weeks |
| Sand between coats | Rushing layers | Uneven texture |
| Mildew-resistant | Standard bathroom paint | Discoloration |
Quality materials cost more upfront but save budget long-term. Get tutorials on surface prep—it’s cheaper than redoing entire projects. Your future self will thank you!
Skimping on Quality and Safety
Quality materials might seem pricey upfront, but they’re the backbone of lasting upgrades. That $15 cubby cabinet project shines when using durable wood instead of flimsy particleboard. Similarly, a $35 outdoor bench built with weather-treated lumber rivals high-end store versions. Smart material choices elevate results while dodging the “homemade” look.
Cutting Corners with Low-Quality Supplies
Cheap brushes shed bristles into paint jobs. Weak brackets collapse under shelf weight. These shortcuts cost more long-term—you’ll redo work or replace failed items. One crafter shared: “I saved $10 on drawer slides, but they jammed within months. Replacing them doubled my budget.”
Safety risks multiply with subpar tools. Wobbly ladders or dull blades invite accidents. Always wear protective goggles and gloves—your wellbeing isn’t negotiable. Watch tutorials to identify critical project elements needing investment versus areas where generic options work.
| Worth Splurging | Budget-Friendly | Reason |
|---|---|---|
| Structural hardware | Decorative knobs | Prevents failures |
| Sandpaper (multi-grit) | Disposable rollers | Ensures smooth finish |
| Safety gear | Paint trays | Protects during work |
Find deals by checking local hardware store sales or online marketplaces for unused name-brand supplies. Remember: Great home improvements balance cost and quality—never compromise on essentials that keep your space safe and stylish.
Ignoring Functionality Over Aesthetics
A stunning room that’s awkward to use defeats its own purpose. Many spaces look magazine-ready but frustrate daily life—like a seating area too narrow for conversation or a living room that blocks natural pathways. Design should solve problems, not create them.
Overlooking Practical Layouts in Every Room
Traffic flow matters in every room. Placing a coffee table too close to the sofa forces guests to sidestep constantly. Designer Ali Henrie’s banquette backrest project solves this by using adjustable curtain rods to create cozy yet functional seating areas without crowding corners.
Consider daily routines when arranging furniture. A breakfast bar with live-edge shelves adds eating space without cramping kitchens. Test layouts by walking through mock setups—get tutorials on using painter’s tape to map furniture footprints before moving heavy pieces.
“Beautiful rooms feel empty if they don’t support real life. Your sofa should face people, not just walls.”
| Smart Choice | Avoid | Benefit |
|---|---|---|
| Durable performance fabric | Delicate materials | Withstands spills |
| Open walkways (36″ wide) | Blocked pathways | Eases movement |
| Adjustable task lighting | Single overhead light | Reduces eye strain |
Balance style with practicality. Layer rugs in high-traffic areas for warmth and durability. Use tutorials to learn lighting placement—aim for three sources per room to blend ambiance and function. Remember: Your space works best when beauty serves life, not the other way around.
Underestimating Budget and Time Commitments
Many enthusiasts dive into upgrades believing they’ll finish by Sunday afternoon. But that rustic blanket ladder requiring three hours? It often stretches into five with sanding delays and stain drying time. Alice and Lois bloggers note their wood plant stand takes 45 minutes—if you’ve prepped materials and tools beforehand.
Costs balloon faster than expected. A $15 ladder project might demand $40 after buying clamps, wood glue, and multiple store trips. One creator shared: “I spent triple my initial budget fixing uneven cuts and replacing warped boards.” Always add a 25% buffer for surprises—like specialty drill bits or extra fabric for mismatched pillows.
| Project | Estimated Time | Reality |
|---|---|---|
| Throw pillows | 10 minutes | 30+ minutes |
| Blanket ladder | 3 hours | 5 hours |
| Plant stand | 45 minutes | 90 minutes |
Break tasks into micro-steps. Painting takes 20 minutes—but waiting for coats to dry adds hours. Beginners should get tutorials on technique pacing. Watch three video guides before starting; you’ll spot time-saving hacks most miss.
Start small. Complete five-minute upgrades like drawer liners before tackling weekend builds. As skills grow, so can project scope. Remember: A finished $10 shelf beats a half-built $100 entertainment center every time.
Misusing Colors, Patterns, and Lighting
Colors and lighting shape a room’s personality, but misuse them and spaces become stressful instead of soothing. Designers like Julie Rose prove smart choices create magic—her Breakfast Room Green walls paired with creamy white trim made a cramped bedroom feel airy using just a thin black dividing line.

Clashing Color Schemes and Overwhelming Walls
Dark navy in a windowless hallway? It feels like walking into a cave. Colors influence mood and spatial perception. Warm terracotta energizes kitchens, while soft blues calm bedrooms. Always test large swatches on your actual walls—morning sun and evening lamps change hues dramatically.
Audrey Scheck’s striped bathroom shows pattern mastery. She used 1-inch painters’ tape and caulking to prevent bleeding. This technique keeps bold designs crisp without chaos. Get tutorials on accent walls before committing—what works online might overwhelm your 10×12 space.
| Recommended Approach | Common Mistake | Result |
|---|---|---|
| 3-color max per room | Rainbow accents | Visual harmony |
| Test swatches at night | Daylight-only checks | Accurate tones |
| Matte for texture | Gloss on uneven walls | Professional finish |
Neglecting Proper Lighting Techniques
That perfect greige turns muddy under yellow bulbs. Lighting impacts color more than you think. Layer sources: overhead for tasks, sconces for ambiance, and window treatments that filter natural light. Designers suggest observing paint samples under your actual lamps before finalizing.
“Lighting should dress your colors for success—like choosing the right shoes for an outfit.”
Dim corners? Try LED strips under cabinets or behind headboards. Get tutorials on installing dimmer switches—they let rooms transform from bright workspaces to cozy retreats. Remember: Your walls and lights are teammates, not rivals.
Overreliance on Trends Without a Personal Touch
Following every design trend can leave your space feeling like a catalog spread—polished but impersonal. Designer Emily Clark proves personality trumps popularity. Her reading nook features framed pages from childhood books and a playful Dr. Seuss quote. This approach invites imagination while reflecting her unique story.
Social media’s endless scroll of aesthetic rooms creates pressure to replicate looks exactly. But spaces that chase every fad often feel disjointed. As Clark notes: “Trends are seasoning, not the main course. Let your memories and passions be the star.”
Instead of full-room makeovers, try these strategies:
- Mix one trending item (like curved furniture) with sentimental pieces
- Use trending colors in small doses through pillows or art
- Update thrifted finds with modern hardware for hybrid style
| Smart Approach | Common Mistake | Result |
|---|---|---|
| Trendy lamp + family photos | All-matchy new purchases | Balanced warmth |
| Vintage frames + modern mats | Generic gallery walls | Unique focal point |
| Bold rug + neutral furniture | Over-themed rooms | Flexible base |
Need help blending styles? Get tutorials on creating accent walls with collected frames. Thrift stores offer cheap, character-rich options—perfect for projects that reveal your quirks. Remember: Your space should spark joy when you walk in, not just impress guests.
Still unsure? Get tutorials analyzing why certain palettes or textures resonate with you. These guides help identify preferences that transcend passing fads. After all, the best rooms feel lived-in, not staged.
Not Considering Room Flow and Scale
Even stunning rooms feel “off” when furniture blocks natural movement or dwarfs the area. A striped wall project using wood panels demonstrates how vertical lines can make a room feel taller—but only if the layout supports easy navigation. Similarly, ladder clothing racks maximize storage without cramping spaces when planned thoughtfully.

Neglecting Proportions and Space Planning
Oversized sectionals in small living areas leave no walking space. Petite accent chairs get lost in grand rooms. Designer Mark Johnson advises: “Measure twice, style once. Your sofa shouldn’t play bumper cars with the coffee table.” Always leave 36 inches between seating and walls for comfortable flow.
Ceiling height matters too. Floor-to-ceiling shelves add drama in loft spaces but overwhelm standard rooms. For 8-foot ceilings, stop panels 12 inches short to maintain balance. Get tutorials on measuring techniques to avoid guesswork.
| Smart Move | Mistake | Outcome |
|---|---|---|
| Low-profile beds | Canopy beds in low rooms | Opens up space |
| Narrow console tables | Bulky desks in hallways | Smooth traffic |
| Vertical wall stripes | Horizontal patterns in narrow rooms | Illusion of height |
Arrange key pieces first. Position beds or sofas before adding decor. Use painter’s tape to map furniture footprints—this trick reveals cramped areas fast. Get tutorials on zoning techniques that define spaces without walls.
Remember: Harmony happens when every item serves a purpose and fits the room’s true scale. Your space should welcome movement, not hinder it.
Conclusion
Crafting a space that reflects your personality doesn’t require perfection—just thoughtful choices. Whether updating throw pillows or building furniture, planning prevents pitfalls. Measure twice, prioritize safety, and let tutorials guide unfamiliar techniques.
Simple updates often deliver the most impact. A fresh coat of paint or well-placed lighting can transform areas without complex renovations. Balance trends with personal touches—your favorite artwork outshines fleeting fads every time.
Remember: Great results come from respecting your budget and room flow. Invest in quality where it counts, like durable hardware or multipurpose furniture. For every $15 quick fix, there’s a $35 project that rivals store-bought elegance when executed carefully.
Ready to start? Get tutorials matching your skill level. With patience and smart prep, even first-timers create spaces that feel both stylish and authentically theirs. Your journey to a refreshed environment begins now—one intentional choice at a time.